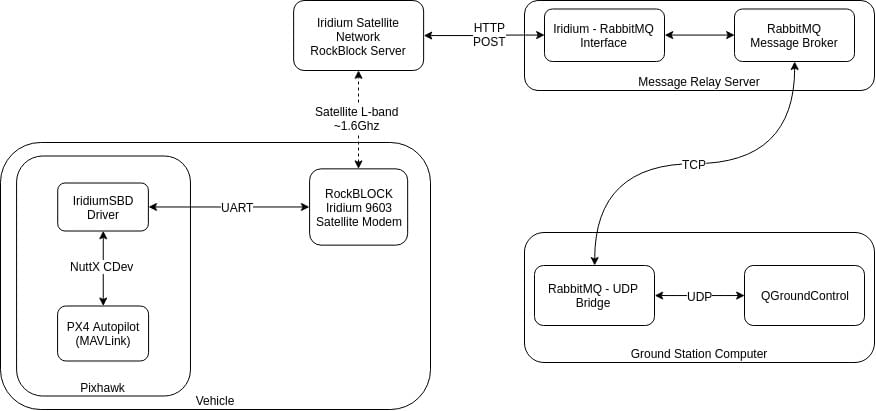
Система супутникового зв'язку Iridium/RockBlock
Система супутникового зв'язку може використовуватись для забезпечення високого діапазону між наземною станцією та транспортним засобом.
Ця тема описує спосіб налаштування системи, яка використовує RockBlock як постачальника послуг для системи зв'язку зі супутниковими системами SBD. З огляду на хорошу якість сигналу, користувачі можуть очікувати затримки від 10 до 15 секунд.
Загальний огляд
Для посилання на супутникове зв'язку потрібні наступні компоненти:
- A RockBlock 9603 Iridium Satellite Modem module connected to a Pixhawk flashed with the PX4 Autopilot.
- Сервер повторного повідомлення працює Ubuntu Linux.
- Автономний комп'ютер запущено QGroundControl на Ubuntu Linux
Нижче показана вся архітектура системи:
:::note The setup was tested with the current release of QGroundControl running on Ubuntu 14.04 and 16.04.
- Можливо запустити систему на інших наземних станціях та операційних системах, але це не було перевірено (і не гарантовано працює).
- The RockBlock MK2 module can also be used. Модуль RockBlock 9603 рекомендується оскільки він є меншим та легшим, одночасно забезпечує той самий функціонал.
:::
Витрати
Посилання на посилання, що працює в Великобританії, складається з вартості оренди лінії та витрат на повідомлення:
- Кожен модуль повинен бути активований, який коштує 10,00 в місяць
- Each message transmitted over the system costs one credit per 50 bytes. Bundles of credits can be bought from RockBlock for £0.04-£0.11 per credit, depending on the bundle size.
Refer to the RockBlock Documentation for a detailed explanation of the modules, running costs and RockBlock in general.
Vehicle Setup
Wiring
Підключіть модуль RockBlock до послідовного порту Pixhawk. Через вимоги до живлення модуля його можна живити лише через високопотужний послідовний порт, оскільки для роботи необхідно максимум 0,5 А при 5 В. Якщо жоден з них недоступний або вільний, то інший джерело живлення, яке має той самий рівень землі, що й Pixhawk і може забезпечити необхідну потужність, повинно бути налаштоване. Деталі щодо роз'ємів та вимог до живлення можна знайти в документації RockBlock.
Модулі
The module can either use the internal antenna or an external one connected to the SMA connector. Для перемикання між двома режимами антен потрібно змінити положення невеликого кабелю RF. Якщо використовується зовнішня антена, завжди переконуйтеся, що антена підключена до модуля перед включенням живлення, щоб уникнути пошкодження модуля.
Стандартна швидкість передачі даних модуля - 19200. Однак драйвер iridiumsbd PX4 вимагає швидкість передачі даних 115200, тому її потрібно змінити за допомогою команд AT.
Підключіться до модуля, встановивши параметри 19200/8-N-1, і перевірте роботу зв'язку за допомогою команди:
AT. Відповідь має бути:OK.Змінити швидкість передачі:
AT+IPR=9Знову підключіться до моделі з параметрами 115200/8-N-1 і збережіть конфігурацію за допомогою:
AT&W0
Модуль тепер готовий до використання з PX4.
Програмне забезпечення
Configure the serial port on which the RockBlock module will run using ISBD_CONFIG. There is no need to set the baud rate for the port, as this is configured by the driver.
:::note If the configuration parameter is not available in QGroundControl then you may need to add the driver to the firmware:
drivers/telemetry/iridiumsbd:::
RockBlock Setup
When buying the first module on RockBlock an user account needs to be created in a first step.
Log in to the account and register the RockBlock module under the My RockBLOCKs. Activate the line rental for the module and make sure that enough credits for the expected flight duration are available on the account. When using the default settings one message per minute is sent from the vehicle to the ground station.
Set up a delivery group for the message relay server and add the module to that delivery group:

Relay Server Setup
The relay server should be run on either Ubuntu 16.04 or 14.04 OS.
The server working as a message relay should have a static IP address and two publicly accessible, open, TCP ports:
5672for the RabbitMQ message broker (can be changed in the rabbitmq settings)45679for the HTTP POST interface (can be changed in the relay.cfg file)
Install the required python modules:
shsudo pip install pika tornado futureInstall the
rabbitmqmessage broker:shsudo apt install rabbitmq-serverConfigure the broker's credentials (change PWD to your preferred password):
shsudo rabbitmqctl add_user iridiumsbd PWD sudo rabbitmqctl set_permissions iridiumsbd ".*" ".*" ".*"Clone the SatComInfrastructure repository:
shgit clone https://github.com/acfloria/SatComInfrastructure.gitGo to the location of the SatComInfrastructure repo and configure the broker's queues:
sh./setup_rabbit.py localhost iridiumsbd PWDVerify the setup:
shsudo rabbitmqctl list_queuesThis should give you a list of 4 queues:
MO,MO_LOG,MT,MT_LOGEdit the
relay.cfgconfiguration file to reflect your settings.Start the relay script in the detached mode:
shscreen -dm bash -c 'cd SatcomInfrastructure/; ./relay.py
Other instructions include:
Detach from the screen:
shctrl+a dKill execution of the script:
shctrl+a :quitReattach to the screen:
shscreen -dr
Ground Station Computer
To setup the ground station:
Install the required python modules:
shsudo pip install pika tornado futureClone the SatComInfrastructure repository:
shgit clone https://github.com/acfloria/SatComInfrastructure.gitEdit the udp2rabbit.cfg configuration file to reflect your settings.
Install QGroundControl (daily build).
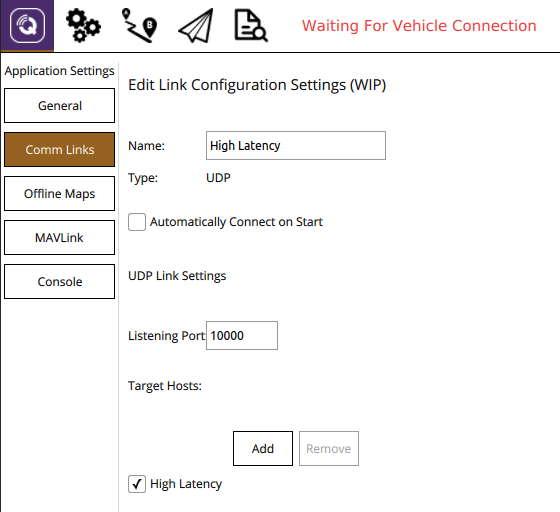
Add a UDP connection in QGC with the parameters:
- Listening port: 10000
- Target hosts: 127.0.0.1:10001
- High Latency: checked
Verification
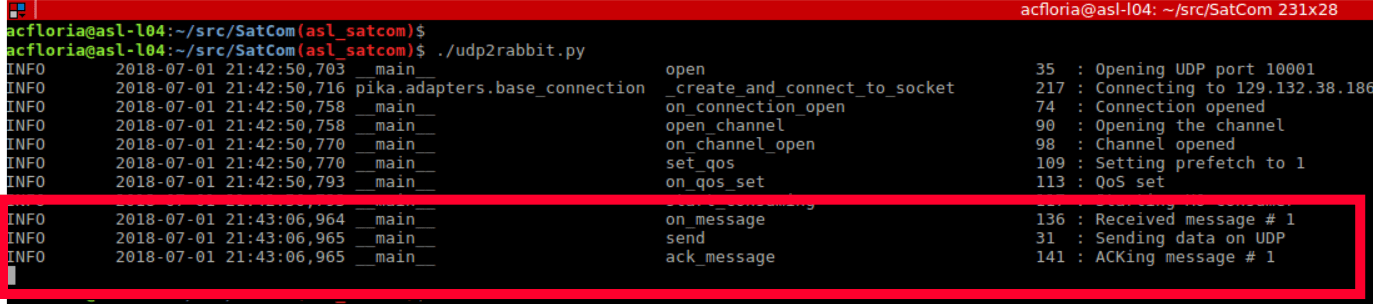
Open a terminal on the ground station computer and change to the location of the SatComInfrastructure repository. Then start the udp2rabbit.py script:
sh./udp2rabbit.pySend a test message from RockBlock Account to the created delivery group in the
Test Delivery Groupstab.
If in the terminal where the udp2rabbit.py script is running within a couple of seconds the acknowledge for a message can be observed, then the RockBlock delivery group, the relay server and the udp2rabbit script are set up correctly:
Running the System
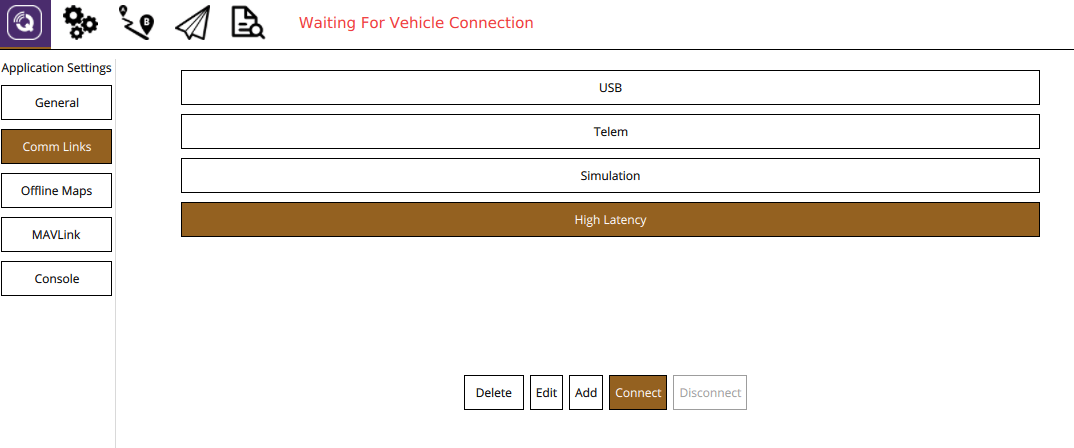
Start QGroundControl. Manually connect the high latency link first, then the regular telemetry link:
Open a terminal on the ground station computer and change to the location of the SatComInfrastructure repository. Then start the udp2rabbit.py script:
sh./udp2rabbit.pyPower up the vehicle.
Wait until the first
HIGH_LATENCY2message is received on QGC. This can be checked either using the MAVLink Inspector widget or on the toolbar with the LinkIndicator. If more than one link is connected to the active vehicle the LinkIndicator shows all of them by clicking on the name of the shown link: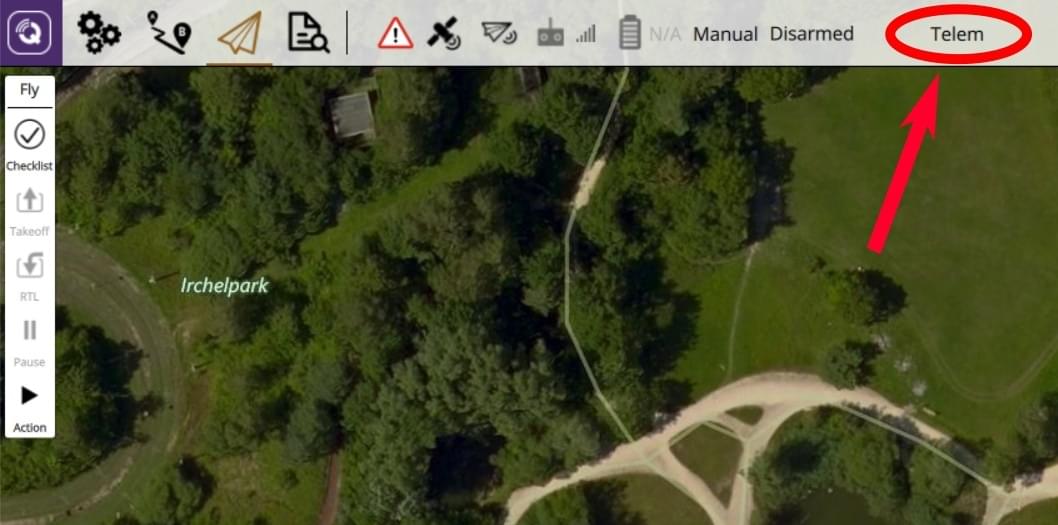
The link indicator always shows the name of the priority link.
The satellite communication system is now ready to use. The priority link, which is the link over which commands are send, is determined the following ways:
If no link is commanded by the user a regular radio telemetry link is preferred over the high latency link.
The autopilot and QGC will fall back from the regular radio telemetry to the high latency link if the vehicle is armed and the radio telemetry link is lost (no MAVLink messages received for a certain time). As soon as the radio telemetry link is regained QGC and the autopilot will switch back to it.
The user can select a priority link over the
LinkIndicatoron the toolbar. This link is kept as the priority link as long as this link is active or the user selects another priority link: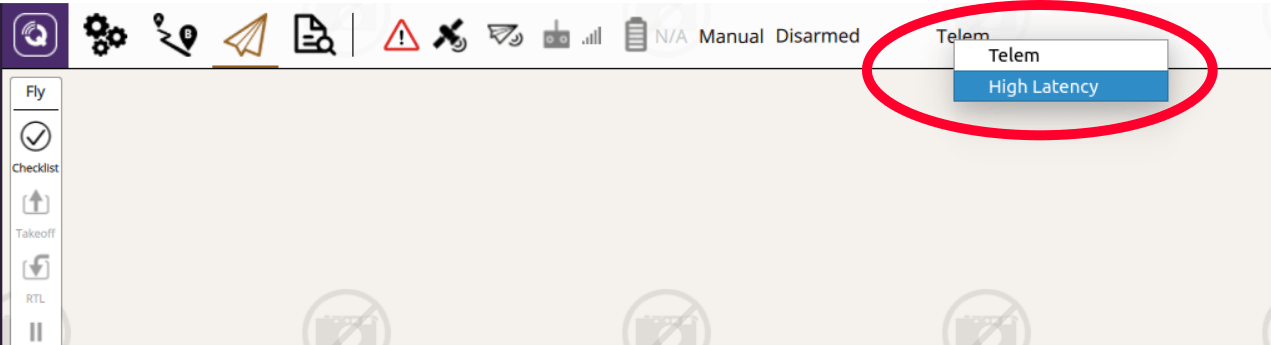
Вирішення проблем
Satellite communication messages from the airplane are received but no commands can be transmitted (the vehicle does not react)
- Check the settings of the relay server and make sure that they are correct, especially the IMEI.
No satellite communication messages from the airplane arrive on the ground station:
Check using the system console if the iridiumsbd driver started and if it did that a signal from any satellite is received by the module:
shiridiumsbd statusMake sure using the verification steps from above that the relay server, the delivery group and the
udp2rabbit.pyscript are set up correctly.Check if the link is connected and that its settings are correct.
The IridiumSBD driver does not start:
- Reboot the vehicle. If that helps increase the sleep time in the
extras.txtbefore the driver is started. If that does not help make sure that the Pixhawk and the module have the same ground level. Confirm also that the baudrate of the module is set to 115200.
- Reboot the vehicle. If that helps increase the sleep time in the
A first message is received on the ground but as soon as the vehicle is flying no message can be transmitted or the latency is significantly larger (in the order of minutes)
- Check the signal quality after the flight. If it is decreasing during the flight and you are using the internal antenna consider using an external antenna. If you are already using the external antenna try moving the antenna as far away as possible from any electronics or anything which might disturb the signal. Also make sure that the antenna is not damaged.